So it’s been 2 years since my last blog post on here (I think), and 8 months since I last picked up a camera.
Truth is I got quite stuck into making wedding videos and it sort of took all the fun out of making videos.
Now that’s not to say I didn’t enjoy making wedding videos because quite frankly I did but filming just became a means to an end and not something I was passionate about anymore. This also came right after my last year at university where I started to fall out of love with filming due to a pretty poor course, which I feel was so different to what was promised that it really missed the mark with me.
8 months ago I edited my final wedding and prepared to move from nothingness/middleofnowehere England to London. I then spent the past 6 months struggling to adapt to big city life and find my place here. Which I never really did because I was too busy waiting for something to happen for me and applying for jobs that were not really what I wanted to do, to realise that I should get out there and do something myself. So with 2018 in full swing I have decided to get off my arse and make a change.
The first change is from DSLR to Iphone 7. All my shots photography and video will be shot solely on Iphone with a little help from apps and accessories. And with the Iphone 7 I’ll be able to shoot some 4K and some slow-motion footage which I am really looking forward to.
Firstly, lets talk accessories.
Olloclip Core Pro Lens set fro Iphone 7
This set consists of Fisheye, Super-Wide and Macro 15x lenses. Which unlike some of the other lens sets gives me much more variety for photo and video alike. Here’s the link to the website for more information on the lenses https://www.olloclip.com/shop/lenses/iphone7-core-lens-set/
There are other Lens sets from Olloclip but this one for me has the best variety. Other companies such as Moment and Exolens make some great phone based lenses and accessories but I’ve found them to be a little pricey and hard to get hold of in the UK. Here are both the links to Exolens and Moment for you to check out. Also I should note that Moment have a pretty good YouTube channel with a great Filmic Pro video on which ill link at the end.
https://exolens.com/
https://www.shopmoment.com/
For sound I’ll be using the Rode Videomic ME for now even though that means I’ll need to run a lightening to audio jack adapter. Let’s see how this goes I may end up switching to the Rode VideoMicro.
http://www.rode.com/microphones/videomicme
Next let’s talk apps.
For editing photos and shooting them I’ll be mostly using Adobe Lightroom CC for Iphone. This app offers awesome in camera controls including manual overrides for exposure, aperture and focus and the editing part of this app allows you to use things such as curves for colour correcting photos. I’ll drop the adobe link in below so you can read more about it.
http://www.adobe.com/uk/creativecloud/photography.html?sdid=V6NZKW2K&mv=search&s_kwcid=AL!3085!3!227038550044!b!!g!!lightroom%206&ef_id=WaGk-gAAAFBDvyvG:20180116153517:s
Last app I’m going to talk about is Filmic Pro now it’s the only paid app I’ve mentioned and at £14.99 if you’re not used to buying apps it might seem like a bit of a stretch, but let me assure you that this is well worth it. It gives you so much control over your video even allowing you to do things like set two focus points and switch between them while shooting.
http://www.filmicpro.com/
Right that’s enough from me. So expect some YouTube and stock footage links being posted to this blog very soon. Here are some awesome videos that probably do a better job than I did at talking about using your phone for shooting video and photo. The Peter McKinnon video is more photo based where the Moment video focuses on using Filmic Pro to shoot on phone.
Hope you enjoy, will be back soon.
Peter McKinnon Videos
https://www.youtube.com/watch?v=AywNcZL6IQQ
https://www.youtube.com/watch?v=Ys63jdks26E
Moments video on Filmic Pro
https://www.youtube.com/watch?v=wWSuKVRpk7I
Tuesday, 16 January 2018
Saturday, 12 October 2013
Script Writing - Drama - Tangerine Dream
Just finished off writing the script for my upcoming drama Tangerine
Dream. it took me best part of two days to get everything down and to
re-edit the script. I'm going to have a couple more read throughs and
then i'm going to give it to a couple of people to read and tell me what
they think.
Saturday, 5 October 2013

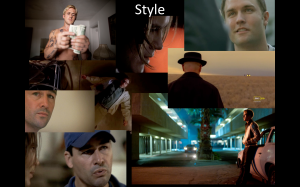
Moodboard for Tangerine Dream
I've never done a mood board before so i thought i'd do one. And much
to my surprise its helped me a lot with the visualization of this
project.
The moodboard below is for the kind of style i want to achieve with this project and includes shots from TV shows Friday night lights and Breaking bad as well as shots from films The Place Beyond the Pines and Drive.
The moodboard below is for the kind of style i want to achieve with this project and includes shots from TV shows Friday night lights and Breaking bad as well as shots from films The Place Beyond the Pines and Drive.

Wednesday, 4 September 2013
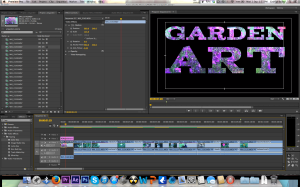
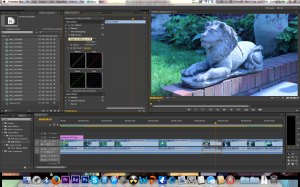
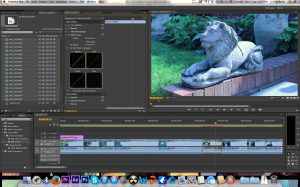
Editing Garden Art 2
The First thing i wanted to do was to create a cut out logo with
video behind for this project. i tried various way such as using text
mask in after effects which i learned how to do from this video: http://tv.adobe.com/watch/short-and-suite/making-text-masks-in-after-effects/
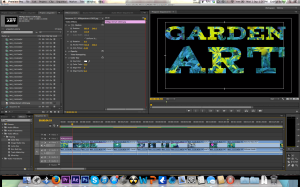
But after trying that i felt that the text wasn't as crisp as i would have liked so i decided to chroma key the text out and place the text on the layer on top of the video. (i created the text in photoshop to make colour keying easier).
Below are 3 different logos i tried.

The next thing i did was to colour correct the video using RGB curves. i like to colour correct using RGB curves as i feel i have more control over the colours. This meant i could make the sky bluer and the trees greener making them stand out more and look more clear as can be seen in the pictures below.

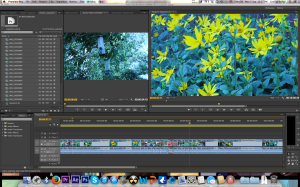

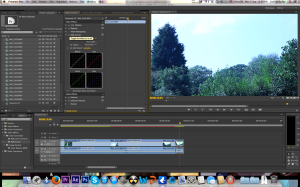
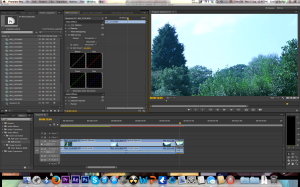
After completing the colour correction i then re watched the video changing a few minor parts and then exported and uploaded the video which you can see in a previous post.
But after trying that i felt that the text wasn't as crisp as i would have liked so i decided to chroma key the text out and place the text on the layer on top of the video. (i created the text in photoshop to make colour keying easier).
Below are 3 different logos i tried.


The next thing i did was to colour correct the video using RGB curves. i like to colour correct using RGB curves as i feel i have more control over the colours. This meant i could make the sky bluer and the trees greener making them stand out more and look more clear as can be seen in the pictures below.


After completing the colour correction i then re watched the video changing a few minor parts and then exported and uploaded the video which you can see in a previous post.
Garden Art 2
Garden art 2 is finally edited and uploaded.
I tried to make this as different as the original as i could while keeping the same sort of style.
More posts to come shortly.
https://vimeo.com/73671924
I tried to make this as different as the original as i could while keeping the same sort of style.
More posts to come shortly.
https://vimeo.com/73671924
Monday, 26 August 2013
filming garden art.....again
I am currently house sitting for my nan so i thought i would take advantage of this and film another Garden Art.
So this morning i filmed for 2 hours in the garden. i got a variety of shots of trees, garden ornaments and close ups of flies, wasps and butterflies.
i am currently transferring the footage to my laptop where i hope to edit it later.
So this morning i filmed for 2 hours in the garden. i got a variety of shots of trees, garden ornaments and close ups of flies, wasps and butterflies.
i am currently transferring the footage to my laptop where i hope to edit it later.
Thursday, 22 August 2013
Sunday, 18 August 2013
Today i set up a new email account gfoxvideoproductions@gmail.com for Gfox Productions.
Along with this i set up a
Facebook: https://www.facebook.com/gfoxvideoproductions
Twitter: https://twitter.com/GfoxPro
Youtube: http://www.youtube.com/user/gfoxvideoproductions
This is where i will now be putting mostly corporate videos.
Along with this i set up a
Facebook: https://www.facebook.com/gfoxvideoproductions
Twitter: https://twitter.com/GfoxPro
Youtube: http://www.youtube.com/user/gfoxvideoproductions
This is where i will now be putting mostly corporate videos.
Reviewing Past Projects/learning
I recently made a video for GTA V. i have watched the video quite a
few time and until yesterday i had never seen an out of place frame in
the middle of the video.
The frame i have left is an in between frame where i have seperated 2 pieces of footage. I am annoyed i havent noticed this before but will be on high alert for such mistakes in future.
The frame i have left is an in between frame where i have seperated 2 pieces of footage. I am annoyed i havent noticed this before but will be on high alert for such mistakes in future.
Saturday, 17 August 2013
Banshee New Sheriff Trailer
i decided to do another trailer for the Cinemax TV show Banshee.
This time i took every episode cutting them up scene by scene and deleting the scenes i did not wish to use. i then chopped up my favourite bits and put them over a 2 minute clip of the sheriff being sworn in.
the trailer can be seen here:
http://www.youtube.com/watch?v=hDKrl48kHfo&feature=youtu.be
This time i took every episode cutting them up scene by scene and deleting the scenes i did not wish to use. i then chopped up my favourite bits and put them over a 2 minute clip of the sheriff being sworn in.
the trailer can be seen here:
http://www.youtube.com/watch?v=hDKrl48kHfo&feature=youtu.be
Saturday, 10 August 2013
Editing Secret Scenes from Banshee
It has recently come to my attention that every episode of the
Cinemax series Banshee has a secret scene after the credits. Sometimes
these scenes reveal future plot lines. I think this is a really good
idea as it gets the viewers to watch the credits and rewards them for
doing so. It is also something i am contemplating doing for future
projects of my own.
After searching for these scenes on the internet i found that the odd one can be found but not a compilation of them all so i decided to edit all of the secret scenes together and upload it which i have done.
The video can be seen below.
After searching for these scenes on the internet i found that the odd one can be found but not a compilation of them all so i decided to edit all of the secret scenes together and upload it which i have done.
The video can be seen below.
Wednesday, 7 August 2013
Planning for Gfox Productions
I've decided that now i have a logo and an Ident for Gfox Productions
the next steps I will take will be to set up an email account
specifically for this branding hoping to expand my audience and maybe
gain some more work experience.
Future plans for the brand if setting up an email and facebook turn out to be beneficial include setting up a website probably one i can edit myself and designing business cards.
Future plans for the brand if setting up an email and facebook turn out to be beneficial include setting up a website probably one i can edit myself and designing business cards.
Tuesday, 6 August 2013
Creating Gfox Logo/Ident
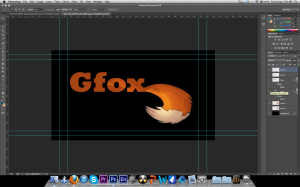
Today i decided to create a Logo and an Ident for Gfox Productions the name i am hoping to use for video production.
I started by choosing a font in photoshop and adding a fox tail to the end of the logo. I then took the same gradient used on the tail to the text to make it look like one object instead of 2 separate objects.
I then finished applying the gradient to the text and removed the background.

I then merged all the graphics that make up the text part of the logo and then did the same for the tail leaving me with 2 layers. this is so that i can manipulate both the text and the tail in after effects.
I then imported the layers separately into after effects. here i added an effect as if the tail was growing from the text. I then added the word 'productions' under the Logo and added an effect as if the text was being typed.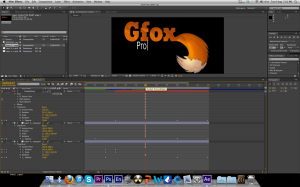
After completing the animation in after effects i then exported (via adobe dynamic link) the footage to premiere pro where i then faded the ident in for 2 seconds and out for 2 seconds (I could have done this in after effects but found it easier and less time consuming to do it in premiere pro). I then added sound effects for the tail growing from the text and then a typing sound for the productions part (again something i could have done in after effects but found it easier in premiere pro)
I started by choosing a font in photoshop and adding a fox tail to the end of the logo. I then took the same gradient used on the tail to the text to make it look like one object instead of 2 separate objects.
The image below shows the text part done and shows me testing to see what the logo looks like.

I then finished applying the gradient to the text and removed the background.

I then merged all the graphics that make up the text part of the logo and then did the same for the tail leaving me with 2 layers. this is so that i can manipulate both the text and the tail in after effects.
I then imported the layers separately into after effects. here i added an effect as if the tail was growing from the text. I then added the word 'productions' under the Logo and added an effect as if the text was being typed.

After completing the animation in after effects i then exported (via adobe dynamic link) the footage to premiere pro where i then faded the ident in for 2 seconds and out for 2 seconds (I could have done this in after effects but found it easier and less time consuming to do it in premiere pro). I then added sound effects for the tail growing from the text and then a typing sound for the productions part (again something i could have done in after effects but found it easier in premiere pro)

A link to the final animated ident can be seen below.
https://vimeo.com/71835211
Sunday, 4 August 2013
GTA V Tralier Finished
Finished colour correcting and made all the final adjustments to the video i started yesterday.
See the finished video below.
See the finished video below.
Saturday, 3 August 2013
Learning While Editing
Today while editing in Adobe Premiere Pro i stumbled across a short cut for razoring clips.
My normal way to do this would be to place the guide on the point of the clip that i wish to razor and then select the razor tool and click on top of the guide. Well today i found that i can simply place the guide on the desired point and press cmd + k (Mac) cntrl +k (windows), this simply razors the clip at that point and when using the razor tool a lot as i have been today you save a lot of time using this method.
My normal way to do this would be to place the guide on the point of the clip that i wish to razor and then select the razor tool and click on top of the guide. Well today i found that i can simply place the guide on the desired point and press cmd + k (Mac) cntrl +k (windows), this simply razors the clip at that point and when using the razor tool a lot as i have been today you save a lot of time using this method.
GTA V Trailer
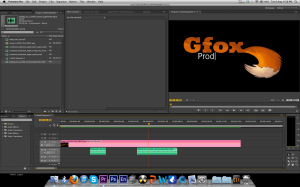
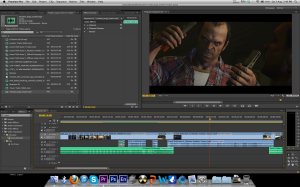
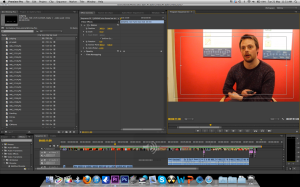
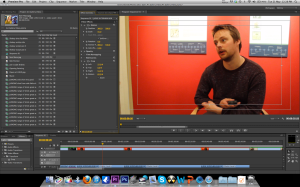
Today i decided to edit an extended version of the upcoming Rockstar game GTA V.
I took all of the existing trailers and mixed them together to make an extended trailer, i swapped out footage from different sections of trailers with other footage. I then extended the soundtrack to the trailers by identifying the track used and replacing it with a long version of the clip.
I split the trailer into 3 sections to focus on the 3 main characters, each with an individual song used in a previous trailer.
The trailer is currently 8 minutes long and i am currently colour correcting it.
Below is a screen shot of me editing footage in Adobe Premiere Pro.

TopBoy Channel 4 Trailer
Yesterday i edited a video for a competition for Channel 4's drama TopBoy.
I edited together a 36 second video consisting of the stock footage provided and added a backing track from the tracks provided.
I submitted the video to Channel 4 for processing and today they uploaded it to their Youtube channel.
Below is a link to the video.
I edited together a 36 second video consisting of the stock footage provided and added a backing track from the tracks provided.
I submitted the video to Channel 4 for processing and today they uploaded it to their Youtube channel.
Below is a link to the video.
Tuesday, 16 July 2013
Garden Art Video (editing)
Yesterday i edited and uploaded the garden art video i did.
i found that the sound of the video on a whole was good and needed very little editing, that said some of the sound clips had a lorry in the background so i simply changed the sound of said clip with the sound from another clip.
Some of the shots I had to crop, trim, change the speed of and colour correct.
I achieved what i wanted with this project which looks arty and abstract which is exactly what i aimed for.
you can view the video in full HD on the link below.
https://vimeo.com/70286684
Sunday, 14 July 2013
Filming Garden Art
Today I decided that i would get my camera out and film with no real objective.
As it was a nice day i took my camera outside and decided that i would concentrate on plants and flowers. My focus was on getting arty close up shots with pulling focus or zooming in. i also used a lot of shots where i locked the camera off as there was movement in the plant due to a slight breeze.
I am going to edit together all the footage later in sort of a montage of clips style and possibly edited the sound where needed.
Saturday, 6 July 2013
Editing Existing Footage of The TV Show Banshee
Today I edited together some existing footage of the TV show Banshee.
I took episode one and edited it down to a 3 min extended trailer.
I kept the edit sharp and snappy by using quick cuts and shots that were full of action.
I am hoping to do more of these videos for more episodes in the series before finally doing a Season Trailer.
You can view this video on vimeo via the link below.
https://vimeo.com/69754190
Sunday, 2 June 2013
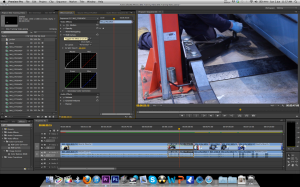
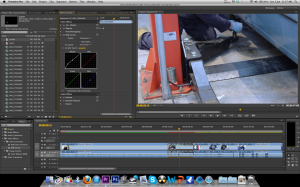
Editing/Colour Correcting Elite Training Video
I've found that as this video was filmed in a garage with no
additional lighting the natural light combined with the florescent bulbs
give everything a blue tint.
To correct this i have combined levels with RGB curves in Adobe Premiere Pro, adjusting the brightness and the blue levels of the clips.
This makes the clips look a lot more natural and makes the images seem sharper and clearer.
To correct this i have combined levels with RGB curves in Adobe Premiere Pro, adjusting the brightness and the blue levels of the clips.
This makes the clips look a lot more natural and makes the images seem sharper and clearer.
Before

After

Friday, 31 May 2013
Editing Elite Training Video
This project has been pretty straightforward editing i think this is
because i was very selective with the footage i was collecting on the
day of filming.
A couple of the shots had the sound ruined but i expected that as i was filming in a mechanics garage and for shots where i was really bothered about the sound i used lapel mics to pick up the speech of the person i was focusing on.
At the moment the project is all laid down in order on the time line in Premiere Pro, i need to sort out cut away shots and add titles as well as colour correct certain clips.
Thursday, 30 May 2013
Filming for Elite Training
today i filmed for elite training at a motor mechanics in Telford, i
filmed various shots of the people fixing a car including shots of;
tires being changed/pumped up, windscreen wipers being tested and blades
being changed, headlights being changed, oil being checked, break pads
being cleaned. among other things.
After filming them doing their activities i then filmed interviews with the 3 lads who are on work on work placement at the mechanics and before interviewing their supervisor at the garage and a company representative from Elite Training.
i am hoping to start editing to night as i am currently transferring footage from my memory card to my laptop.
i have arranged to deliver the video on DVD to the client next Wednesday. giving me a week to edit the entire project and get it burnt to DVD.
Tuesday, 28 May 2013
experimenting with adobe soundbooth - Starting filming
Today i have been experimenting with Adobe Soundbooth. I have used
Soundbooth on several occasions in the past but thought it best to
familiarize myself with it a bit more as i am hoping to use it to record
a voice over for my up and coming project that i am doing for Elite
Training.
I have had a few test recordings in soundbooth making sure everything is running ok and playback is up to the standard i want, which it all is.
I am hoping to get the voice over recorded tonight. i will be taking my DSLR with lapel mics as a back up.
I start filming for this project tomorrow and hopefully will start editing either tomorrow night or Thursday.
Speaking to Clients - Filming Wednesday
A couple of days ago I was approached by someone who had seen the
video that I had done for the County Council and they showed interest in
me doing a similar video for them.
So after several phone calls and emails the client and I have come to the agreement that start filming Wednesday and have the video back to him a week later.
The client wants a 20 - 30 minute video outlining the children on work placements, what they do, what they learn, what their employers think etc...
I feel that this is the perfect opportunity for me to gain more experience filming as well as more experience working to clients and meeting their briefs.
Wednesday I will be meeting the client at a mechanics in Telford where I will be filming.
I have decided that I will be filming the whole thing on my DSLR and that i will be using lapel mics for the interviews as they worked very well for the interviews that I did for the Art Gallery video and the video I did for the County Council.
I am really pleased for someone to have been impressed enough by work for them to want a video done by me. I am pleased that my video making skills have improved to the point where other people can see quality in the work I do.
Saturday, 25 May 2013
Using GoPro in non-action events.
Something i've been interested in for a while is the use of GoPro
Action Cams in dramas, music videos etc... i've previously seen shots in
things like Breaking Bad and have even used my own GoPro in my last drama for POV shots and low ground shots.
This morning i came across a music video by The D.O.T which is shot almost entirely on a GoPro Hero 3. the video consists of the two members of the group walking around the streets of Birmingham, videoing themselves singing along to the song and throwing the camera in the air. this gives a good view of the surroundings and is something very original. This has made me re-think the use of the GoPro and think of different ways i could use mine.
below are some screen shots from the music video. The whole thing can be watched here http://www.youtube.com/watch?v=JqrliWEYIko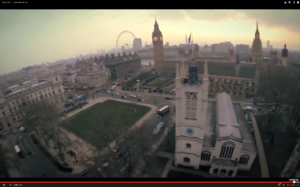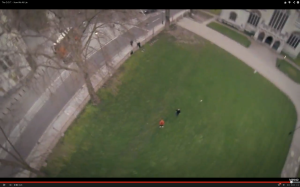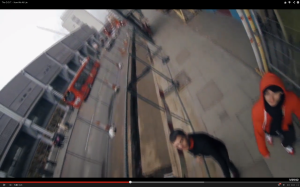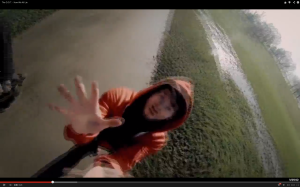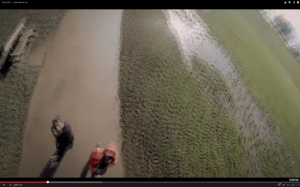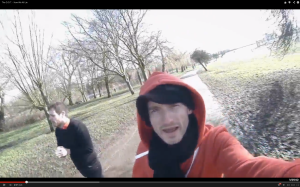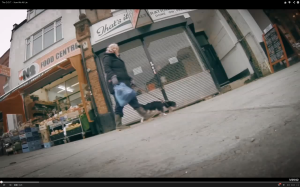


Colour Correcting Open Art Stills
I decided that the still images i had used in the open art video were
a little bit dull. so rather than editing them in photoshop which i
felt would be time consuming and would have the same effect of colour
correcting in premiere. I used RGB curves, i upped the brightness and
took down the green colouring as the back ground was a yellow colour,
this made the pictures stand out from the background.
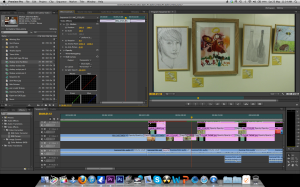
Before
After
Before

After
Before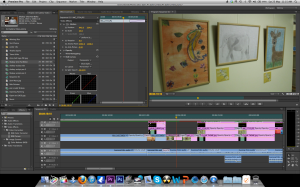

After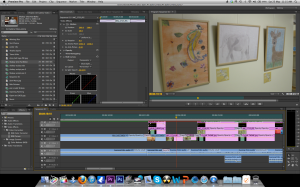

I feel that the pictures are a lot brighter and alot easier on the eye when colour corrected.
Editing Over Exposed Background objects
Right this might seem like a bit of a bodge-job but it worked.
i had a shot that was fine in colour and lighting but was devalued by over exposed white boards in the back of the shot. i tried adjusting the brightness of the clip and colour correcting the clip both of which effected the subjects in the foreground to much making the clip look dull and lifeless.
i then decided that i would overlay the video with itself on the adobe timeline twice, i then cropped out everything except the board to the left applied the tool RGB Curves and adjusted the brightness and colours untill the board was no longer over exposed. i then repeated this technique for the second board.
Before


i had a shot that was fine in colour and lighting but was devalued by over exposed white boards in the back of the shot. i tried adjusting the brightness of the clip and colour correcting the clip both of which effected the subjects in the foreground to much making the clip look dull and lifeless.
i then decided that i would overlay the video with itself on the adobe timeline twice, i then cropped out everything except the board to the left applied the tool RGB Curves and adjusted the brightness and colours untill the board was no longer over exposed. i then repeated this technique for the second board.
Below
you can see the before and after images. This technique worked for me
as the moving foreground images did not at any point in the video cross
the overexposed background image if they had i would have not been able
to use this technique.
Before

After

Before

After

Friday, 24 May 2013
Editing Art Gallery Video - Burning DVDs
Today I had a meeting with my client from the art gallery. She was
pleased with the changes made and has advised on a few more changes that
i have taken on-board and have edited in today. hopefully this project
is nearly complete and after another viewing from the client i can burn
the DVD and it will be installed in the Shire Hall Art Gallery Stafford.
I also met with a client of which i did a project for a couple of months ago, i met him today to burn a final DVD something that he didn't feel he needed at the time when i completed the video but now feels it would benefit him to have a DVD copy of the video.
I also met with a client of which i did a project for a couple of months ago, i met him today to burn a final DVD something that he didn't feel he needed at the time when i completed the video but now feels it would benefit him to have a DVD copy of the video.
Subscribe to:
Posts (Atom)